 (1).png)

- Login
- Register
How to Install Stone Cladding on a Wall – Step by Step Installation Guide
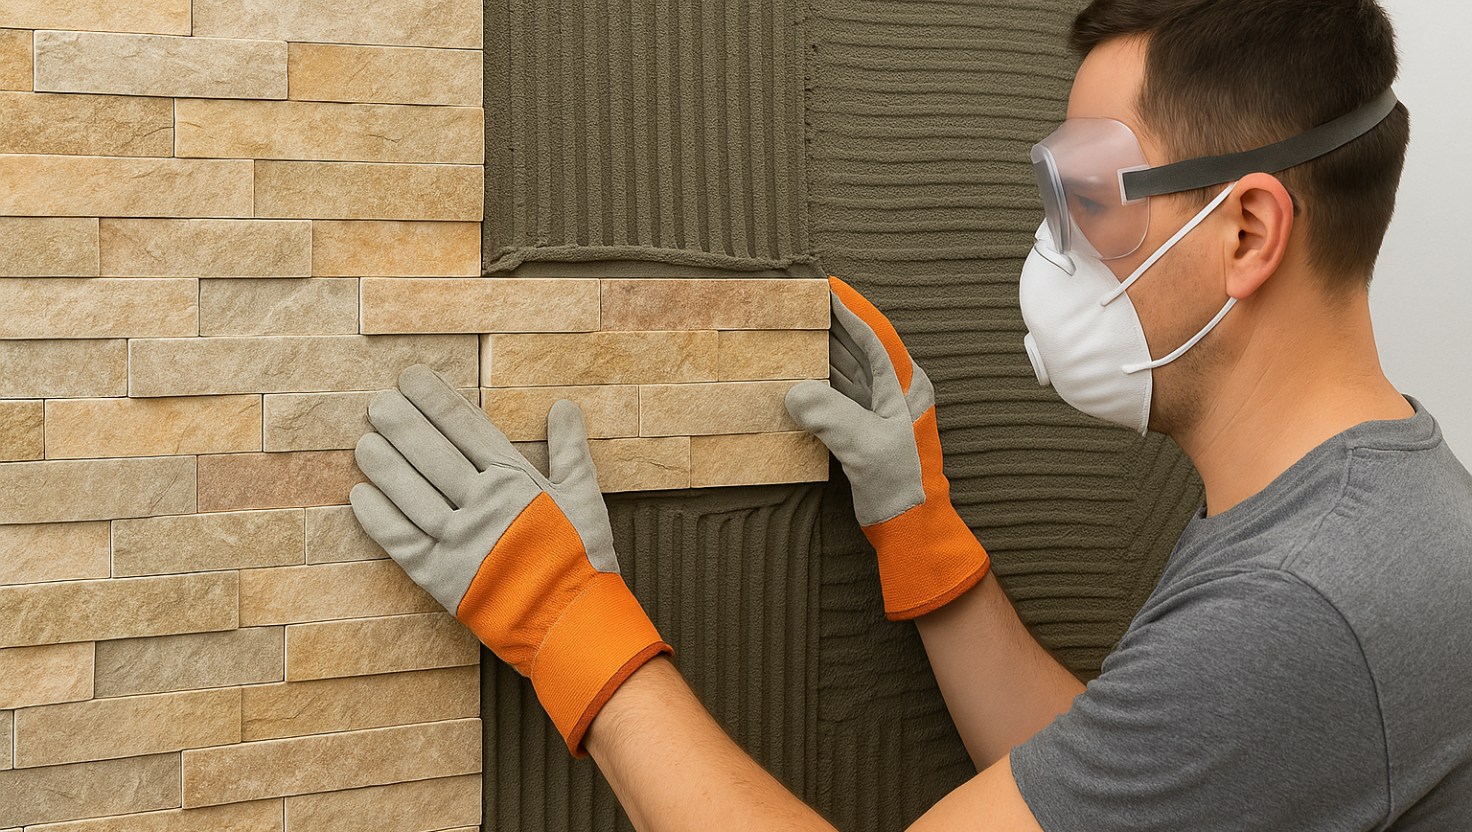
Table of Contents
- Prepare the Wall Surface
- Apply Cement Grit Plaster Base Coat
- Dry Mock-Up of Stone Tiles (Joint Planning & Layout)
- Apply Tile Adhesive on Wall & Tiles
- Fixing the Stone Tiles
- Grouting the Joints Between the Stones
- Final Surface Cleaning and Finishing
- Use of Protective Equipment
- Pro Tips from Earthstona
- FAQs
- 11. Conclusion
Natural stone cladding enhances the visual appeal and character of any space — whether it’s a luxurious villa, a high-end apartment, or a commercial project like hotels or resorts. However, to ensure the cladding lasts for decades while looking aesthetically flawless, it’s important to follow a proper Indian-standard installation method. At Earthstona, India’s only premium stone artwork manufacturer and exporter, we strongly recommend the cement grit plaster and tile adhesive method — a durable and time-tested installation technique suitable for Indian climatic conditions.
Below is a step-by-step professional guide for installing natural stone cladding on interior and exterior walls using industry-best practices.
1. Prepare the Wall Surface
Before you start the stone installation, preparing the wall surface is critical. The wall must be structurally sound, dust-free, and levelled. Begin by thoroughly cleaning the surface to remove dust, loose particles, paint, oil, or grease. If the wall has old paint or plaster, scrape and sand it off to expose the raw surface. For undulated or cracked walls, use cement mortar to patch up uneven areas and ensure the surface is flat using a spirit level or plumb line. This foundational preparation ensures maximum adhesive grip and prevents detachment or misalignment in the future.
2. Apply Cement Grit Plaster Base Coat
Once the surface is cleaned and leveled, apply a cement grit plaster to improve adhesion. This is especially important for exterior surfaces or damp-prone interior walls.
- Use a cement:sand ratio of 1:4 for the plaster.
- Apply a 10–12 mm thick grit plaster layer with a rough finish, not smooth.
- Add waterproofing agents or bonding agents if recommended.
- Allow the base plaster to cure for 3–5 days before proceeding.
The rough texture of this grit coat allows the tile adhesive to bind effectively to the wall, ensuring long-term durability.
3. Dry Mock-Up of Stone Tiles (Joint Planning & Layout)
Before actual installation, mock-up the stone tiles on the floor or directly on the wall using spacers:
- Arrange tiles in the intended pattern and fix the joint width (commonly 3–6 mm).
- Ensure alignment, stone color tone balance, and interlocking are visually consistent.
- If you’re working with carvings, murals, or patterns (like motifs or deity carvings), plan accordingly so elements line up correctly.
- Measure the space and mark guidelines on the wall for vertical and horizontal positioning.
Recommendation: Create a mortar grid layout based on height and stone color variation to ensure uniform distribution of hues and maintain visual harmony across the wall.
4. Apply Tile Adhesive on Wall & Tiles
The next step is applying tile adhesive, a modern and cleaner alternative to traditional cement mortar. It offers better bonding and ease of work.
- Choose a high-strength, weather-resistant tile adhesive suitable for stone.
- Mix the adhesive per the manufacturer's instructions.
- Apply adhesive both on the wall surface and on the back of each stone tile (dual application ensures superior grip).
- Use a notched trowel to spread the adhesive evenly with a thickness of 5–8 mm.
- Work in small sections to prevent the adhesive from drying before tile placement.
Important Note: Avoid applying cement or adhesive directly on the visible surface of the stone. Cement stains are extremely difficult to remove and may ruin the natural finish. Contact us for the expert advice https://earthstona.com/
5. Fixing the Stone Tiles
Begin installing the stone cladding from the bottom row upward:
- Press each tile firmly against the wall, sliding slightly to ensure proper contact with the adhesive.
- Ensure joint alignment and level using spacers, a level, and a rubber mallet for gentle tapping.
- Maintain consistent joint width throughout the installation.
- Apply interlocking placement if the stone is designed with irregular edges for a seamless look.
- Check vertical and horizontal lines continuously to avoid sloping or shifting.
6. Grouting the Joints Between the Stones
After all tiles are fixed and the adhesive is partially cured:
- Use grout that matches the stone color to maintain aesthetic consistency.
- Fill the joints using a grout bag or rubber float.
- Remove excess grout using a damp sponge before it hardens.
- Avoid over-filling or applying grout over the stone face.
Allow the grout to set and cure completely before cleaning or applying any finishes.
7. Final Surface Cleaning and Finishing
Once the grout is fully cured (usually after 24–48 hours), carefully clean the stone surface:
- Use a dry soft brush or cloth to remove dust.
- If needed, lightly wash with clean water and neutral stone-safe cleaner.
- Never use acidic or abrasive cleaners as they can damage natural stones.
- For outdoor walls or wet zones, apply a breathable water-repellent sealant to protect the stone from moisture, algae, and staining.
8. Use of Protective Equipment
Stone cladding installation involves heavy lifting, cutting, and working with chemicals:
- Eye Protection: To guard against stone dust and sharp chips during cutting or grinding.
- Gloves: For safe handling of rough-edged stones and adhesives.
- Face Mask: To avoid inhalation of dust, particularly in closed interior spaces.
Ensuring worker safety is as important as the quality of the stone.
9. Pro Tips from Earthstona
- Never apply cement directly on the decorative surface of the stone tiles, contact us or expert advice (+91)93064-07303.
- Always allow sufficient curing time at every stage.
- Match stone patterns and tones before fixing to maintain design consistency.
- For vertical outdoor walls above 10 feet, consider mechanical anchoring systems in addition to adhesives.
10. FAQs on Installing Stone Cladding in India
1. Can I install stone cladding directly on painted walls?
No. You need to remove the paint and apply a cement grit plaster to ensure proper adhesion.
2. Is waterproofing necessary before cladding?
Yes, especially for exterior or damp-prone areas. Waterproofing increases the longevity of the installation.
3. Which is better – cement or tile adhesive?
Tile adhesive is preferred for interiors and dry zones. Cement-based methods may be used with additives for exteriors.
4. How to clean the cladding after installation?
Use only mild soap and water or stone-safe cleaners. Avoid acids or harsh chemicals.
5. Can I do the installation myself?
Stone cladding requires expert handling to ensure safety and aesthetics. It’s best to hire professional installers.
11. Conclusion
Natural Stone wall cladding is a long-term investment in aesthetics and structural character. Following Indian-standard installation methods — like using cement grit plaster and tile adhesive, along with proper layout planning, mortar grid preparation, and safety measures — ensures that your stone walls remain elegant and secure for years.
Whether you're designing a luxury living room, a peaceful pooja space, or a high-end resort façade, trust Earthstona’s expertise as India’s only premium natural stone manufacturer and exporter, provides high-quality stone wall panels, carvings, and murals ideal for every space—whether in India, the USA, UAE, UK, Australia, New Zealand, Saudi Arabia, or Europe.
Explore our range and get expert installation support at https://earthstona.com.